Developed by Laurie Hurson
This workshop will walk through the steps to building a WordPress site on the CUNY Academic Commons. Explanations and paired activities walk the user through the dashboard, how to create pages, posts, and menus, adding media, and customizing the site with header images, themes and plugins.
Learning Goals
-
- Utilize the basic functions of the Dashboard
- Gain familiarity with the difference between pages and posts
- Strengthen ability to add content and media to a course site
Introduction
Many professors teach with a site on the CUNY Academic Commons, welcome to the club! We are happy you’re here. Teaching with a site on the Commons gives you as the instructor lots of flexibility to design and customize your site, incorporate OER, and engage students in multimodal projects that uplift and develop student knowledge and foster their digital skills. Don’t feel you have to do all these things at once! You can develop your pedagogical approach to open and digital teaching over time.
By now, you have probably created a Commons account, determined you would like to build a site, and here you are. If you haven’t joined the commons and created a site, or are still confused about the differences between a group and a site, go through the “Getting Started” workshop and then circle back here.
To recap: Your site will be a customizable WordPress websites hosted on the CUNY Academic Commons. On course websites, you can make the course syllabus and assignments visible to students in a dynamic format (by links, images, and multimedia). Students can also take advantage of multimedia composition possibilities when posting their own work and/or commenting on their peers’ writing. Sites can be private (visible to site members only), semi-private (visible to Commons users only), or public.
Go to your newly created site. (Again, if you haven’t created a Site, go through the “Getting Started” workshop). You may notice that your new site is mostly blank, or you may have used the Teaching Template and your site has preloaded pages that you can now edit. This workshop will go over the basics of editing and customizing your site and adding content. The explanations and activities will assume you did not use the teaching template and that your site is “empty” by default. All the steps are the same whether or not you used the template. The only difference is if you used the teaching template to create your site, rather than creating pages you will just click into the already created page to edit.
The activities will walk you through the site basics, pairing explanations with active steps you will take to build out your site. Many of these steps are also outlined in the documentation for Managing a Site and Teaching and Learning on the Commons.
Let’s get started…
Explanations & Activities
As you work through these Commons workshops, join our Commons Group to ask questions and get help. Post questions about building your site in the forum thread “Building a Course Site”.
Navigating and Building your Site: The Dashboard
When viewing your new site you will see the default theme and the “Hello World!” message. At the top of the page you will see the black admin bar. This bar is important for navigating from the “frontend” of your site (what site visitors see) and the “backend”, also called the “Dashboard” where you will make changes to your site.
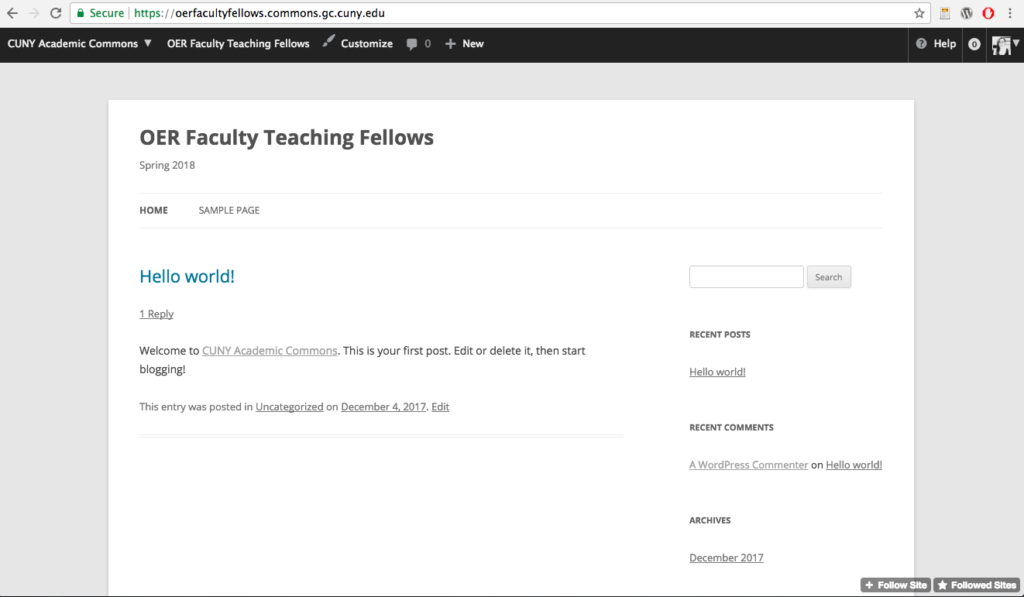
In the black admin bar, you will see [your site title], above the title is “OER Faculty Teaching Fellows”. If you click or hover your mouse over the title, you will see the “Dashboard” option. Click [your site title] to navigate to the backend. You can always use [your site title] button to go between the front and back end of your site.
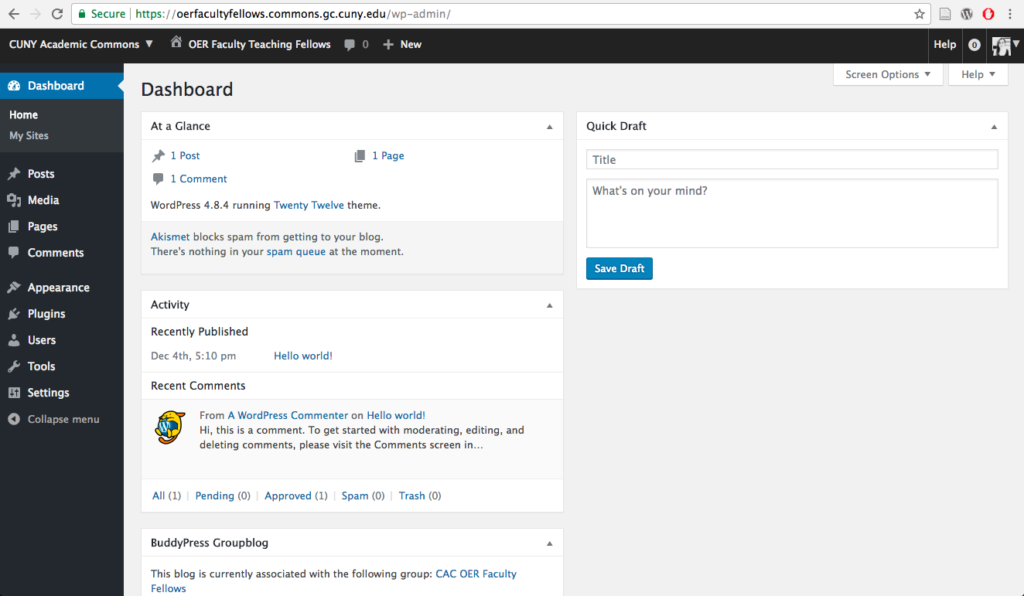
Once you are on the Dashboard (backend, below), you will see the black sidebar menu on the left. This menu contains all options for editing your site. Each menu item (Pages, Posts, Media) are areas where you add content or edit your site. Hovering your mouse over each menu item reveals a quick link to the different areas of the Dashboard.
Activity: Find your Dashboard
-
- Go to your site. You can get to your site by going to the Commons home page and Clicking “Sites” menu item and clicking the “My Sites” tab. Or, you can click your Avatar in the upper right corner and navigate to “My Sites”.
- Once you are on your site: Are you on the front or back end? Use the [site title] button in the back admin bar to go back and forth from the front to the backend.
- Go to your Dashboard and view your site privacy settings in Settings>Reading. Privacy settings can always be changed, see below.
Site Privacy Settings
There are five privacy settings for sites on the Commons. The top two options are “public” and the site can be viewed by anyone. The second option (“Discourage search engines…”) makes it less likely someone will stumble upon your site but it is still public and visible.
The last three options are more private, ranging from visible to all CUNY Commons users, to visible only to Commons users you add to the site, and finally, visible only to you (and Commons/site admins). You can always change this setting later by going to Site Visibility in Settings>Reading in the Dashboard.
It is up to you how public/private you would to make your course site. There are pedagogical and technological arguments for both public/private site visibility settings. For now, you may want to keep the site private but visible to all Commons users so we can see each other’s sites.
Pages and Post
Pages and posts serve different purposes on your site. Pages are best used for static (unchanging) information, like syllabus details or basic course information. Posts are better if you want to create multiple entries. Posts can be organized using “categories” to sort them into specific topics areas. Think of Posts like blog entries or short articles and Pages as the space for more basic information about the site.
Professors typically create pages to host course content and assign students to create posts as a weekly check-in or to turn in assignments.
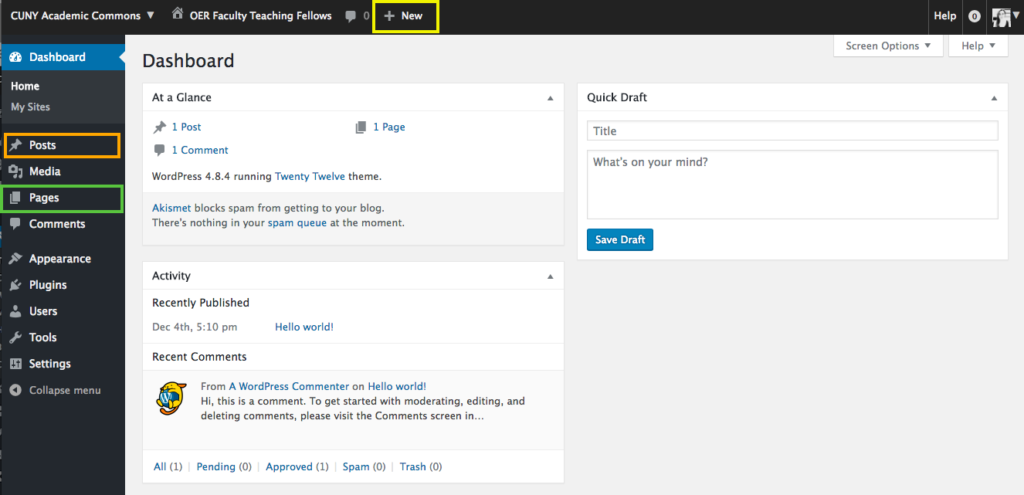
‘Posts’, ‘Pages’, ‘+New’ Highlighted Above
You can create pages and posts in two ways:
-
- In the dashboard, visit the “Pages” or “Posts” area and click the “Add New” button on the top left.
- When viewing the “front end” of the site, hover over “+New” and select Page or Post.
Editing Pages and Posts
Once you are in the Page/Post editor the screen will look the same (it will tell you if it’s a page or post at the top of the editor).
Use the editor to write the title and content of your page/post. When you are ready to make your post live (add it to the site), hit the Publish button on the right.
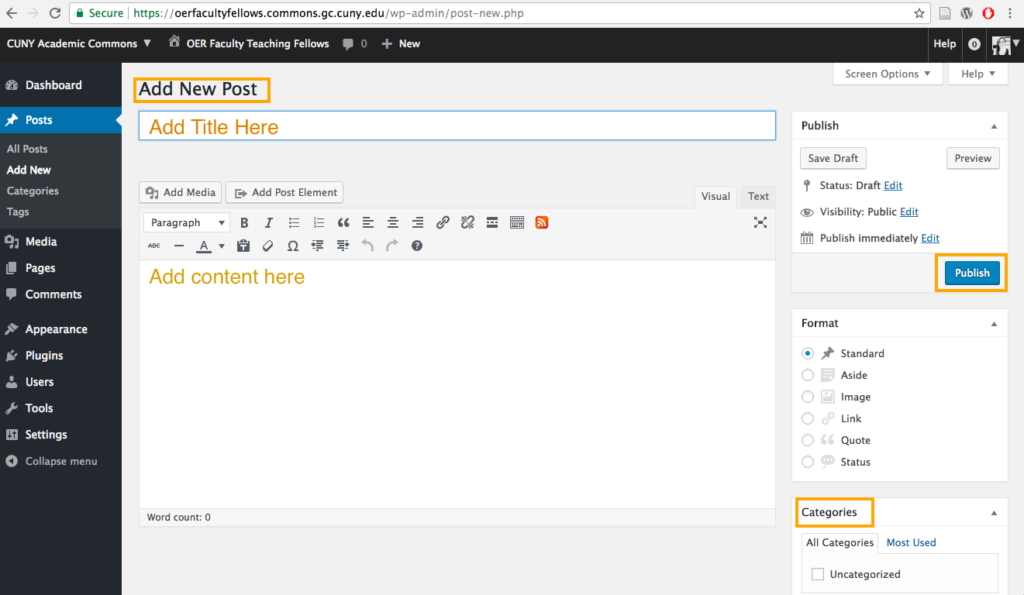
You might notice that the page/post editor in the image above is different from what you are seeing. This is the difference between the classic editor and the block editor. The classic editor is featured in the image above. You might be seeing the block editor, a cleaner, simplistic editor. People new to WordPress often find the Classic editor easier to understand and learn how to use. You can switch to the classic editor in two ways:
Make Classic editor your default editor
-
- Settings > Writing > Default editor for all users > Classic > Save
Turn on Classic Editor for a single Page/Post
-
- Click into the page/post > click 3 dots in upper right corner > Switch to classic editor
Activity: Create 3 Pages
-
- Create 3 pages you will use in your course (Ex: Syllabus, Course Schedule, Resources)
- If you already have these pages created, open them and delete the default content.
- In both cases, remember you need to click the “Publish/Update” button to save
Pages and Posts: Additional Information
Using Categories and Tags
If you are creating a post, you may want to “Categorize” your post so that these posts can be filtered into a specific area with the other posts in that category. Categories can be created by visiting “Posts> Categories” through the Dashboard. Posts can also be categorized using the Category box in the right sidebar when editing the post. A good rule of thumb is one (maybe two) category per post.
Tags can be added to a Post to specify keywords you would like associated with that post. Many tags can be associated with a single post to link it to various ideas and themes. These tags can be displayed on the site using a tag cloud (located and setup through Appearance> Widget area).
Categories and tags cannot be created for pages.
Creating a Static Home (Front) Page
On a site that uses a WordPress framework (like the Commons) the default home page is the blogroll of most recent posts.
Once you have created several pages, you can select one of these pages to appear as your home page – the first thing people see when they visit your site.
To set up your home page visit Settings>Reading in the Dashboard. In the “Front Page Displays”, select the Page you would like to be your home page.
Next to “Posts Page” you will need to determine where you would like the Posts to display*. You can create a Page called “Blog” or “Posts” and select it here so that all posts can be viewed in a single blog roll.
*If you do not want site visitors to be able to view the entire blog roll (all posts) you do not need to set a posts page. Maybe you want site visitors view posts in their specified categories. If so, you will need to categorize posts and list the Categories in your widget area or set up access to the category archive in your menu (see below).
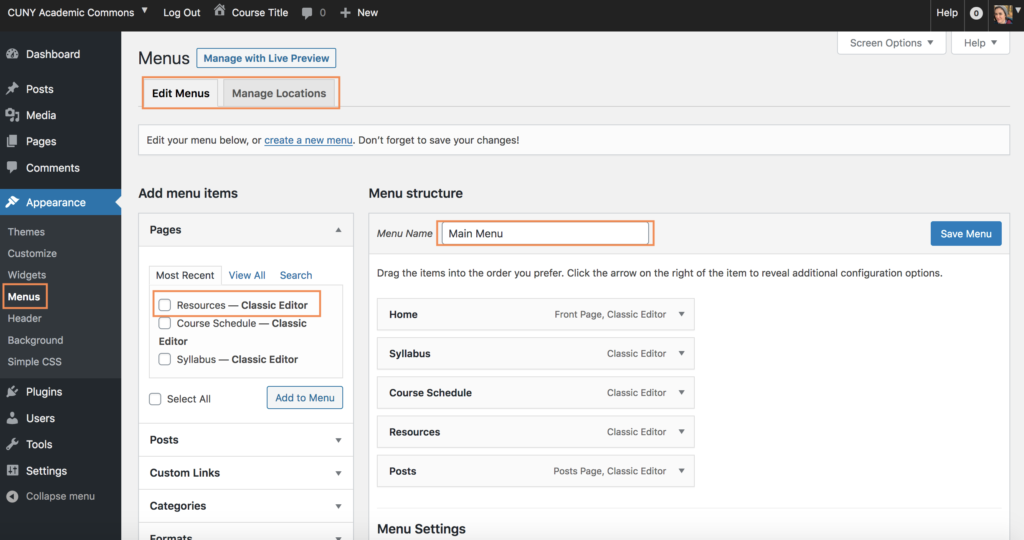
Setting up a Menu
After you have created several pages and posts, visit “Appearance>Menus” to set up the menus for your site.
Create a “menu name” in the empty field in the center of the page. Then, add pages, individual posts, categories, or custom links to the menu via the box on the left. Using the “Categories” section, you can create an areas of the site the lists all posts in a specific category, called a Category Archive.
Once you have added menu items, drag and drop the items to change the order. Be sure to Save your menu.
In some themes you must set the Menu Location. To do this, click the “Manage Locations” tab at the top right of the Menu page. Make sure to set you main menu in the “Primary” location.
Different themes will have different menu location options. You may also be able to create footer and other menus. To create these menus you would follow the same process by creating a new menu (in the edit menu tab), naming the menu, adding menu items, and then managing the location.
Creating Sub (drop-down) Menus
If you indent a menu item (moving it inwards to the right) the indented item will appear as a drop down menu from the above item. Use the drag-and-drop arrow that appears when the mouse hovers over a menu item. Use this drag-and-drop arrow to indent desired drop-down menu item under the main menu item.
Please be aware: having more than 1-2 drop down items and/or sub-sub menus (2nd level indentation) often does not meet access
Activity: Build a Custom Menu
-
- Go to Appearance>Menus.
- Clear out any pages or posts that are listed in the box on the right. Often WordPress pre-populates the menu area with a custom homepage link and other menu items, but you will likely want your menu to include the home and other pages you created.
- Create a “menu name” in the empty field in the center of the page.
- Add pages, individual posts, categories, or custom links to the menu via the box on the left. Using the “Categories” section, you can create an areas of the site the lists all posts in a specific category, called a Category Archive.
- Save your menu and visit the manage locations tab to make sure it is your primary menu. You may need to repeat this step visiting “manage locations” if you change your theme.
Adding Media
On the Commons, “media” refers to any file that is not already on the Commons. This includes:
-
- Powerpoints Word docs, Excel spreadsheets, and other files
- PDF Readings (should be Creative Commons licensed)
- Images (should be open or Creative Commons licensed)
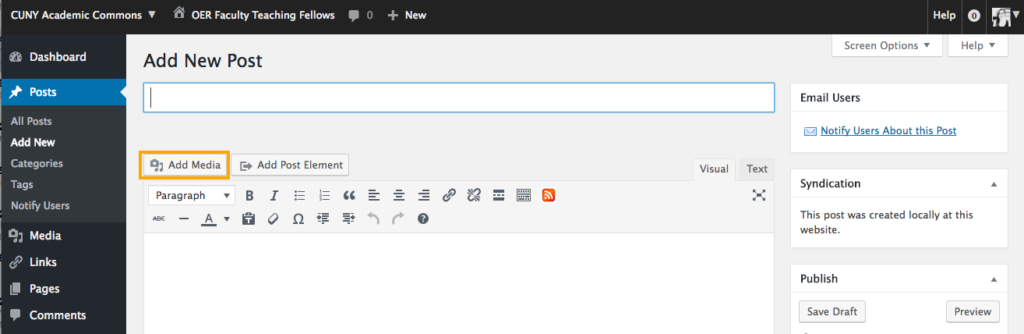
To add media directly into a page or post, click the “Add Media” button at the top of the content editor.
Media that is uploaded and inserted into pages and posts will be visible and accessible to anyone who can see your site, which depends on your site visibility settings. If you want to make Powerpoints and PDFs available only to your students, you can either change the site visibility settings or use the “Files” section, located in the Group area of the Commons
Adding Video
Any Youtube or Vimeo videos will be automatically embedded on your site. Copy/Paste the URL into any page or post and the video will appear.
Activity: Add a PDF of your Syllabus
-
- Go to the page of post where you want to add the syllabus (or other media)
- Click “Add Media”
- Upload PDF from you computer to the site
- Edit PDF Title (this is the text that will appear as a link to download PDF from your site)
- Click Insert.
This process can be used to add PDFs, word docs, and image to a page or post.
Customizing your Site
Okay, now that you have some content (pages and posts), a menu, and static home page. You can begin customizing the design of the site. Designing and customizing your site involves playing around with header images, colors, themes and plugins. Watch this video for a short but in-depth tour of ways to customize your site.
Themes
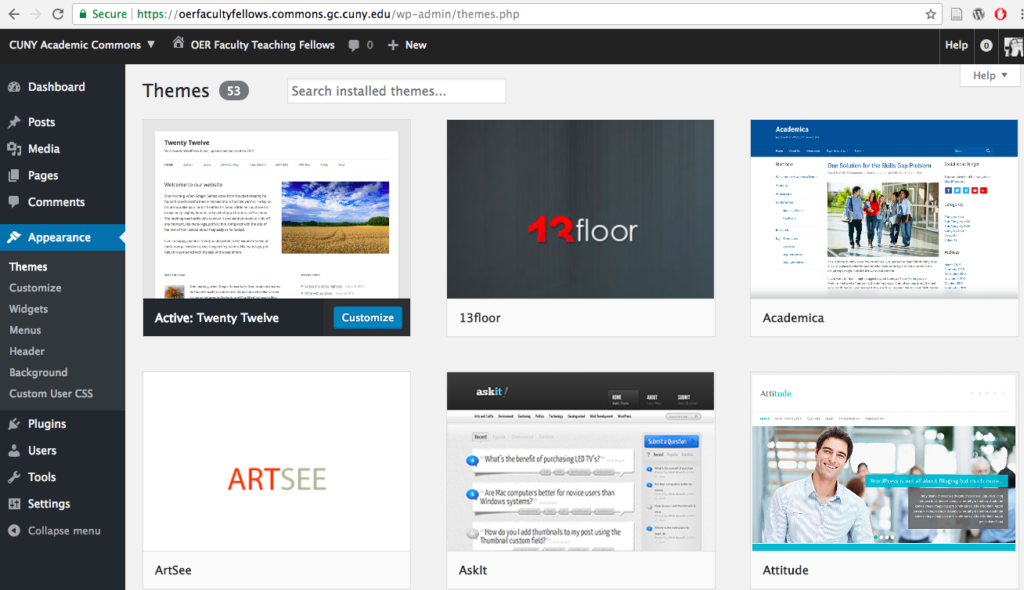
The look of the site is largely governed by its theme. Themes can be viewed by navigating to Appearance>Themes via the Dashboard menu (black bar on left). You can “Live Preview” a theme to get a better idea about what it will look like before you “Activate” it, making it live on your site.
Before choosing a theme you should make one or two Pages and a few test Posts to get an idea about how the site will look (See below). If there is no content on the site, you will not get an accurate view how the theme determines the layout for the site.
Different themes provide varying options for layout, menus, widget areas etc. so you should play with a couple themes before you decide which one to use for your course. A few things to think about when choosing a theme:
-
- Flexibility: Do you want a theme that will look good on a smart phone or tablet? If so, you probably want to choose a “responsive” theme.
- Customization: Will you want to change the fonts, colors, and background of the site? If so you probably want a theme with a lot of customization possibilities. Some themes once installed provide options to make these changes or have a separate theme customization menu.
- Columns and Widget areas: Are you going to want sidebar space for a tag cloud or sub menu? If so, you probably want to choose a theme that has sidebar widget areas and or multiple columns. This info is often outlined in “theme details” when viewing the themes in the Dashboard.
- Text vs. Image centric Themes: If your course will be image/media-focused you may want to choose a theme that prominently displays images. Most themes will nicely feature text but there are some minimalist themes that focus exclusively on text, often getting rid of margins and sidebars to feature text more prominently.
Activity: Try out a few Themes
-
- Go to to Appearance>Themes via the Dashboard menu
- Browse themes using “Live Preview” to get a better idea about what it will look like on your site
- Once you have chosen a theme, “Activate” it to make it live on your site
Widgets
Most theme layouts have multiple columns, one of which contains main content and one or more of which is a sidebar where other information can appear. Any of the things that can live in a sidebar or footer in the theme’s layout are called widgets. Some of these widgets are built-in features of WordPress (e.g. list of categories, list of recent posts) whereas others are plugins (e.g. Twitter feed, list of items in a Google Calendar). You can add widgets to your site via Appearance > Widgets in the Dashboard.
Some common widgets on course sites:
-
- Recent Posts (displays posts in sidebar)
- Category Sub-menu (to show different assignments, etc.)
- Text Widget to display Course Info (I.e. meeting time, room, professor email)
- Twitter or RSS Feed to display course-related content
- Add Users site bar widget – Allows admin to add “Join This Site” button to easily add students to the course site
Plugins
A plugin provides additional functionality for your site. For example, you might want to include your Twitter feed or create a forum for students to ask questions. You can browse and activate the plugins you want to use on your website in the Plugins Menu on the Dashboard.
Some common plugins used on course sites are listed below. If you want to install all of these plugin at once, you can install the “Teaching include:
-
- Authors Widget — Creates a widget to list users designated as “authors” (students) in the sidebar of the site; when “author name” is clicked, it links to a list of all posts by that author.
- Category Sticky Post — Allows a single post from a category to “stick” to the top of the category archive.
- Hypothesis — Create an annotation sidebar on posts, pages, and PDFs (on public sites).
- Google Docs Shortcode — Allows administrators to embed and display Google Drive contents such as docs, sheets, and slides directly on their Commons site.
- Imsanity — Limits the file size for uploaded photos, preserving space on your site.
- Reckoning — Organizes, counts, and displays student posts and comments for assessment.
- WP Accessibility — Helps improve accessibility in your WordPress site.
- WP Grade Comments — Allows instructors to provide private feedback on posts in the form of comments that are visible only to instructor and the student author. Private comments also offer the option to include numerical feedback on students’ posts.
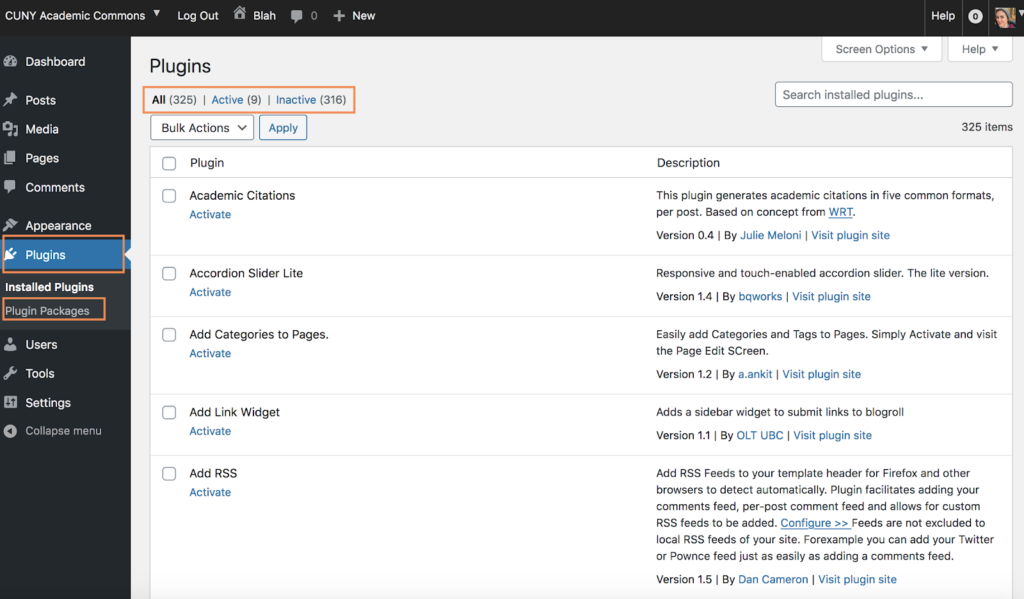
Activity: Check which Plugins are active on your site
-
- Go to the Plugins area of the dashboard
- Check to see if there are any active plugins on your site. If the word “active” is not in the top menu, there are no plugins active on your site.
- Click into the plugin packages and install the “Teaching” plugin package
- Browse other plugins to see how they might improve the functionality of your site.
- Don’t install plugins willy-nilly. Only install plugins you plan to actively use. If you are not using a plugin, uninstall it. Too many plugins can make your site run slow and cause other issues.
Takeaways
Congrats! You have started building out your course site on the CUNY Academic Commons. Keep working through these steps to continue adding content and media for your course, and customizing the site design. You
The next steps include adding all your course content, thinking through assignments, and determining whether students join your site, or just get the course information from your site and turn in assignments elsewhere.